

Nginx+Lua实战灰度发布与WAF
1.Lua脚本基础语法
Lua是一个简洁、轻量、可扩展的脚本语言
Nginx+Lua优势
充分的结合Nginx的并发处理epool优势和Lua的轻量实现简单的功能且高并发的场景
统计IP
统计用户信息
安全WAF
1.安装lua
[root@Nginx-Lua ~]# yum install lua -y
2.lua的运行方式
#命令行执行, 交互式
[root@Nginx-Lua ~]# lua
Lua 5.1.4  Copyright (C) 1994-2008 Lua.org, PUC-Rio
> print("Hello,World")
Hello,World

#文件执行方式, 非交互式
[root@Nginx-Lua ~]# cat test.lua
#!/usr/bin/lua
print("Hi is qmf!")

[root@Nginx-Lua ~]# lua ./test.lua
Hi is qmf!
3.Lua的注释语法
# --行注释
#!/usr/bin/lua
--print("Hi is Bgx!")
#块注释
--[[
    注释代码
--]]
4.Lua的基础语法
变量定义
a = 123
#布尔类型只有mil和false
#数字0,空字符串都是true
#lua中的变量如果没有特殊说明, 全是全局变量
while循环语句
[root@nginx ~]# cat while.lua
#!/usr/bin/lua
sum =0
num =1
while num <= 100 do
    sum = sum + num
    num = num + 1
end
print("sum=",sum)

#执行结果
[root@nginx ~]# lua while.lua
sum=    5050

#Lua没有++或是+=这样的操作
for循环语句
[root@nginx ~]# cat for.lua
#!/usr/bin/lua
sum = 0
for i = 1,100 do
        sum = sum + 1
end
print("sum=", sum)

#执行结果
[root@nginx ~]# lua for.lua
sum=    100
if判断语句
[root@nginx ~]# cat if.lua
#!/usr/bin/lua
if age == 40 and sex == "Man" then
    print("男人大于40")
    elseif age > 60 and sex ~= "Woman" then
    print("非女人而且大于60")
    else
    local age = io.read()
    print("Your age is",age)
    end
#~=是不等于
#字符串的拼接操作符".."
#io库的分别从stdin和stdout读写,read和write函数
2.Nginx加载Lua环境
默认情况下Nginx不支持Lua模块, 需要安装LuaJIT解释器, 并且需要重新编译Nginx, 建议使用openrestry
LuaJIT
Ngx_devel_kit和lua-nginx-module
1.环境准备
[root@nginx ~]# yum -y install gcc gcc-c++ make pcre-devel zlib-devel openssl-devel
2.下载最新的luajit和ngx_devel_kit以及lua-nginx-module
[root@nginx ~]# mkdir -p /soft/src && cd /soft/src
[root@nginx ~]# wget http://luajit.org/download/LuaJIT-2.0.4.tar.gz
[root@nginx ~]# wget https://github.com/simpl/ngx_devel_kit/archive/v0.2.19.tar.gz
[root@nginx ~]# wget https://github.com/openresty/lua-nginx-module/archive/v0.10.13.tar.gz
3.解压ngx_devel_kit和lua-nginx-module
#解压后为ngx_devel_kit-0.2.19
[root@nginx ~]# tar xf v0.2.19.tar.gz

#解压后为lua-nginx-module-0.9.16
[root@nginx ~]# tar xf v0.10.13.tar.gz
4.安装LuaJIT Luajit是Lua即时编译器。
[root@nginx ~]# tar zxvf LuaJIT-2.0.3.tar.gz
[root@nginx ~]# cd LuaJIT-2.0.3
[root@nginx ~]# make && make install
5.安装Nginx并加载模块
[root@nginx ~]# cd /soft/src

[root@nginx ~]# wget http://nginx.org/download/nginx-1.12.2.tar.gz

[root@nginx ~]# tar xf nginx-1.12.2.tar.gz

[root@nginx ~]# cd nginx-1.12.2
./configure --prefix=/etc/nginx --with-http_ssl_module \
--with-http_stub_status_module --with-http_dav_module \
--add-module=../ngx_devel_kit-0.2.19/ \
--add-module=../lua-nginx-module-0.10.13

[root@nginx ~]# make -j2 && make install

#建立软链接, 不建立会出现share object错误
ln -s /usr/local/lib/libluajit-5.1.so.2 /lib64/libluajit-5.1.so.2

#加载lua库,加入到ld.so.conf文件
echo "/usr/local/LuaJIT/lib" >> /etc/ld.so.conf
ldconfig
也可以直接部署春哥的开源项目OpenResty
#安装依赖包
yum install -y readline-devel pcre-devel openssl-devel
cd /soft/src

#下载并编译安装openresty
wget https://openresty.org/download/ngx_openresty-1.9.3.2.tar.gz
tar zxf ngx_openresty-1.9.3.2.tar.gz

cd ngx_openresty-1.9.3.2
./configure --prefix=/soft/openresty-1.9.3.2 \
--with-luajit --with-http_stub_status_module \
--with-pcre --with-pcre-jit

gmake && gmake install
ln -s /soft/openresty-1.9.3.2/ /soft/openresty

#测试openresty安装
vim /soft/openresty/nginx/conf/nginx.conf
server {
    location /hello {
            default_type text/html;
            content_by_lua_block {
                ngx.say("HelloWorld")
            }
        }
}
3.Nginx调用Lua指令
Nginx调用Lua模块指令, Nginx的可插拔模块加载执行, 共11个处理阶段
| 语法 | |
|---|---|
| set_by_lua set_by_lua_file | 设置Nginx变量,可以实现负载的赋值逻辑 |
| access_by_lua access_by_lua_file | 请求访问阶段处理, 用于访问控制 |
| content_by_lua content_by_lua_file | 内容处理器, 接受请求处理并输出响应 |
Nginx调用Lua API
| 变量 | |
|---|---|
| ngx.var | nginx变量 |
| ngx.req.get_headers | 获取请求头 |
| ngx.req.get_uri_args | 获取url请求参数 |
| ngx.redirect | 重定向 |
| ngx.print | 输出响应内容体 |
| ngx.say | 输出响应内容体,最后输出一个换行符 |
| ngx.header | 输出响应头 |
4.Nginx+Lua实现代码灰度发布
使用Nginx结合lua实现代码灰度发布
按照一定的关系区别,分不分的代码进行上线,使代码的发布能平滑过渡上线
1.用户的信息cookie等信息区别
2.根据用户的ip地址, 颗粒度更广
实践架构图
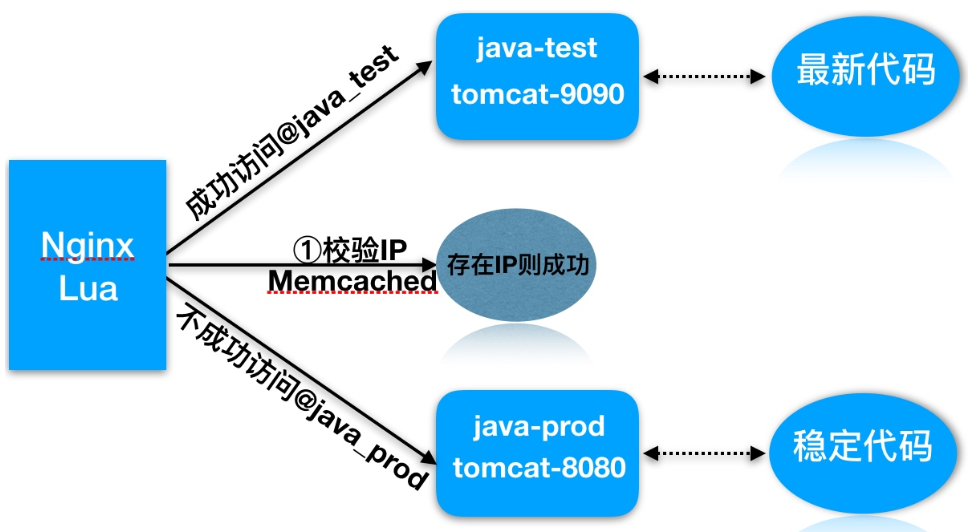
执行过程:
1.用户请求到达前端代理Nginx, 内嵌的lua模块会解析Nginx配置文件中Lua脚本
2.Lua脚本会获取客户端IP地址,查看Memcached缓存中是否存在该键值
3.如果存在则执行@java_test,否则执行@java_prod
4.如果是@java_test, 那么location会将请求转发至新版代码的集群组
5.如果是@java_prod, 那么location会将请求转发至原始版代码集群组
6.最后整个过程执行后结束
实践环境准备:
| 系统 | 服务 | 地址 |
|---|---|---|
| CentOS7 | Nginx+Lua+Memached | 192.168.56.11 |
| CentOS7 | Tomcat集群8080_Prod | 192.168.56.12 |
| CentOS7 | Tomcat集群9090_Test | 192.168.56.13 |
1.安装两台服务器Tomcat,分别启动8080和9090端口
[root@tomcat-node1-20 ~]# yum install java -y
[root@tomcat-node1-20 ~]# mkdir /soft/src -p
[root@tomcat-node1-20 ~]# cd /soft/src
[root@nginx ~]# wget http://mirrors.tuna.tsinghua.edu.cn/apache/tomcat/tomcat-9/v9.0.7/bin/apache-tomcat-9.0.7.tar.gz
[root@tomcat-node1-20 src]# tar xf apache-tomcat-9.0.7.tar.gz  -C /soft
[root@tomcat-node1-20 soft]# cp -r apache-tomcat-9.0.7/ tomcat-8080
[root@tomcat-node1-20 bin]# /soft/tomcat-8080/bin/startup.sh
#注意tomcat默认监听在8080端口, 如果需要启动9090端口需要修改server.xml配置文件
2.配置Memcached并让其支持Lua调用
#安装memcached服务
[root@Nginx-Lua ~]# yum install memcached -y

#配置memcached支持lua
[root@Nginx-Lua ~]# cd /soft/src
[root@Nginx-Lua ~]# wget https://github.com/agentzh/lua-resty-memcached/archive/v0.11.tar.gz
[root@Nginx-Lua ~]# tar xf v0.11.tar.gz
[root@Nginx-Lua ~]# cp -r lua-resty-memcached-0.11/lib/resty/memcached.lua /etc/nginx/lua/

#启动memcached
[root@Nginx-Lua ~]# systemctl start memcached
[root@Nginx-Lua ~]# systemctl enable memcached
3.配置负载均衡调度
#必须在http层
lua_package_path "/etc/nginx/lua/memcached.lua";
upstream java_prod {
        server 192.168.56.12:8080;
}
upstream java_test {
        server 192.168.56.13:9090;
}
server {
        listen 80;
        server_name 47.104.250.169;
        location /hello {
                default_type 'text/plain';
                content_by_lua 'ngx.say("hello ,lua scripts")';
        }
        location /myip {
                default_type 'text/plain';
                content_by_lua '
                        clientIP = ngx.req.get_headers()["x_forwarded_for"]
                        ngx.say("Forwarded_IP:",clientIP)
                        if clientIP == nli then
                                clientIP = ngx.var.remote_addr
                                ngx.say("Remote_IP:",clientIP)
                        end
                        ';
        }
        location / {
                default_type 'text/plain';
                content_by_lua_file /etc/nginx/lua/dep.lua;
        }
       location @java_prod {
                proxy_pass http://java_prod;
                include proxy_params;
        }
        location @java_test {
                proxy_pass http://java_test;
                include proxy_params;
        }
}
#nginx反向代理tomcat,必须配置头部信息否则返回400错误 [root@nginx-lua conf.d]# cat ../proxy_params proxy_redirect default; proxy_set_header Host $http_host; proxy_set_header X-Real-IP $remote_addr; proxy_set_header X-Forwarded-For $proxy_add_x_forwarded_for; proxy_connect_timeout 30; proxy_send_timeout 60; proxy_read_timeout 60; proxy_buffer_size 32k; proxy_buffering on; proxy_buffers 4 128k; proxy_busy_buffers_size 256k; proxy_max_temp_file_size 256k;
4.编写Nginx调用灰度发布Lua脚本
[root@nginx ~]# cat /etc/nginx/lua/dep.lua
--获取x-real-ip
clientIP = ngx.req.get_headers()["X-Real-IP"]
--如果IP为空-取x_forwarded_for
if clientIP == nil then
    clientIP = ngx.req.get_headers()["x_forwarded_for"]
end
--如果IP为空-取remote_addr
if clientIP == nil then
     clientIP = ngx.var.remote_addr
end
--定义本地,加载memcached
    local memcached = require "resty.memcached"
--实例化对象
    local memc, err = memcached:new()
--判断连接是否存在错误
    if not memc then
        ngx.say("failed to instantiate memc: ", err)
        return
    end
--建立memcache连接
    local ok, err = memc:connect("127.0.0.1", 11211)
--无法连接往前端抛出错误信息
    if not ok then
        ngx.say("failed to connect: ", err)
        return
    end
--获取对象中的ip-存在值赋给res
    local res, flags, err = memc:get(clientIP)
--
 --ngx.say("value key: ",res,clientIP)
    if err then
        ngx.say("failed to get clientIP ", err)
        return
    end
--如果值为1则调用local-@java_test
    if res == "1" then
        ngx.exec("@java_test")
        return
    end
--否则调用local-@java_prod
        ngx.exec("@java_prod")
        return
5.使用Memcache set IP, 测试灰度发布
//telnet传入值
[root@nginx conf.d]# telnet 127.0.0.1 11211
# set对应IP
set 211.161.160.201 0 0 1
# 输入1
1
5.Nginx+Lua实现WAF应用防火墙
1.常见的恶意行为
爬虫行为和恶意抓取,资源盗取
防护手段
1.基础防盗链功能不让恶意用户能够轻易的爬取网站对外数据
access_moudle->对后台,部分用户服务的数据提供IP防护
解决方法
server {
        listen 80;
        server_name localhost;
        set $ip  0;
        if ($http_x_forward_for ~ 211.161.160.201){
        set $ip 1;
        }
        if ($remote_addr ~ 211.161.160.201){
        set $ip 1;
        }
        # 如果$ip值为0,则返回403, 否则允许访问
        location /hello {
                if ($ip = "0"){
                return 403;
                }
                default_type application/json;
                return 200 '{"status":"success"}';
        }
2.常见的攻击手段
后台密码撞库,通过猜测密码字典不断对后台系统登陆性尝试,获取后台登陆密码
防护手段
1.后台登陆密码复杂度
2.使用access_module-对后台提供IP防控
3.预警机制
文件上传漏洞,利用上传接口将恶意代码植入到服务器中,再通过url去访问执行代码
执行方式bgx.com/1.jpg/1.php
解决办法
location ^~ /upload {
    root /soft/code/upload;
    if ($request_filename ~* (.*)\.php){
        return 403;
    }
}
3.常见的攻击手段
利用未过滤/未审核的用户输入进行Sql注入的攻击方法, 让应用运行本不应该运行的SQL代码
防护手段
1.php配置开启安全相关限制
2.开发人员对sql提交进行审核,屏蔽常见的注入手段
3.Nginx+Lua构建WAF应用层防火墙, 防止Sql注入

1.快速安装lnmp架构
[root@nginx ~]# yum install mariadb mariadb-server php php-fpm php-mysql -y
2.配置Nginx + php
[root@nginx conf.d]# cat phpserver.conf
server {
        server_name 47.104.250.169;
        root /soft/code;
        index index.html index.php;
location ~ \.php$ {
    fastcgi_pass   127.0.0.1:9000;
    fastcgi_index  index.php;
    fastcgi_param  SCRIPT_FILENAME  /soft/code/$fastcgi_script_name;
    include        fastcgi_params;
        }
}
3.配置MySQL
[root@nginx ~]# systemctl start mariadb
MariaDB [(none)]> create database info;
MariaDB [(none)]> use info;
MariaDB [info]> create table user(id int(11),username varchar(64), password varchar(64), email varchar(64));
MariaDB [info]> desc user;
+----------+-------------+------+-----+---------+-------+
| Field    | Type        | Null | Key | Default | Extra |
+----------+-------------+------+-----+---------+-------+
| id       | int(11)     | YES  |     | NULL    |       |
| username | varchar(64) | YES  |     | NULL    |       |
| password | varchar(64) | YES  |     | NULL    |       |
| email    | varchar(64) | YES  |     | NULL    |       |
+----------+-------------+------+-----+---------+-------+

4.插入数据
MariaDB [info]> insert into user (id,username,password,email) values(1,'qmf',('123'),'bgx@foxmail.com');
MariaDB [info]> select * from info.user;
+------+----------+----------------------------------+-----------------+
| id   | username | password                         | email           |
+------+----------+----------------------------------+-----------------+
|    1 | qmf      | 123                             | qmf@foxmail.com |
+------+----------+----------------------------------+-----------------+
1 row in set (0.00 sec)
5.配置php代码
[root@nginx conf.d]# cat /soft/code/login.html
<html>
<head>
        <title> Sql注入演示场景 </title>
        <meta http-equiv="content-type"content="text/html;charset=utf-8">
</head>
<body>
<form action="sql.php" method="post">
<table>
        <tr>
                <td> 用 户: </td>
                <td><input type="text" name="username"></td>
        </tr>
        <tr>
                <td> 密 码: </td>
                <td><input type="text" name="password"></td>
        </tr>
        <tr>
                <td><input type="submit" value="提交"></td>
                <td><input type="reset" value="重置"></td>
        </tr>
                </table>
        </form>
</body>
</html>


#被html调用的sql.php文件
[root@nginx conf.d]# cat /soft/code/sql.php
<?php
        $conn = mysql_connect("localhost",'root','') or die("数据库连接失败!");
        mysql_select_db("info",$conn) or die ("您选择的数据库不存在");
        $name=$_POST['username'];
        $pwd=$_POST['password'];
        $sql="select * from user where username='$name' and password='$pwd'";
        echo $sql."<br />";
        $query=mysql_query($sql);
        $arr=mysql_fetch_array($query);
        if($arr){
                echo "login success!<br />";
                echo $arr[1];
                echo $arr[3]."<br /><br />";
        }else{
                echo "login failed!";
        }
?>
5.使用lua解决此类安全问题

6.部署Waf相关防护代码
[root@nginx ~]# cd /soft/src/
[root@nginx ~]# git clone https://github.com/loveshell/ngx_lua_waf.git

#把ngx_lua_waf复制到nginx的目录下,解压命名为waf
[root@nginx ~]# cp -r ngx_lua_waf /etc/nginx/waf

#在nginx.conf的http段添加
lua_package_path "/etc/waf/?.lua";
lua_shared_dict limit 10m;
init_by_lua_file  /etc/waf/init.lua;
access_by_lua_file /etc/waf/waf.lua;

#配置config.lua里的waf规则目录(一般在waf/conf/目录下)
RulePath = "/etc/nginx/waf/wafconf/"

#绝对路径如有变动,需对应修改, 然后重启nginx即可

#Nginx + lua防止Sql注入
[root@nginx ~]# vim /etc/nginx/waf/wafconf/post
\sor\s+

6.防止CC攻击
[root@nginx ~]# vim /etc/nginx/waf/config.lua
CCrate="100/60"


- 控制面板
- 搜索
- 你好,朋友
-
真是美好的一天!
- 站点信息
-
- 文章总数:90
- 页面总数:0
- 分类总数:9
- 标签总数:0
- 评论总数:0
- 浏览总数:119133
 豫公网安备41042502000209号