

Linux-yum软件管理
YUM基本介绍
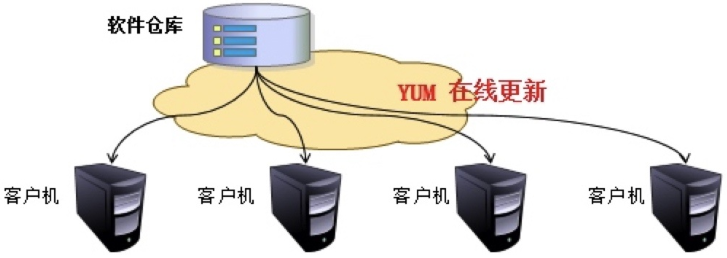
1.什么是YUM
Yum是RedHat以及CentOS中的软件包管理器。能够通过互联网下载 .rpm 包并且安装,并可以自动处理依赖性关系,无须繁琐地一次次下载、安装。
2.YUM源是什么
1要成功的使用 YUM 工具安装更新软件或系统,就需要有一个包含各种 rpm 软件包的repository(软件仓库),这个软件仓库我们习惯称为 yum 源。(可以是本地源、网络源)
3.YUM源配置实例
1.阿里BASE源
#因为CentOS默认是国外的源,有时候安装速度会很慢,所以我们更换国内源
#CentOS 6
wget -O /etc/yum.repos.d/CentOS-Base.repo http://mirrors.aliyun.com/repo/Centos-6.repo
#或者
curl -o /etc/yum.repos.d/CentOS-Base.repo http://mirrors.aliyun.com/repo/Centos-6.repo

#CentOS 7
wget -O /etc/yum.repos.d/CentOS-Base.repo http://mirrors.aliyun.com/repo/Centos-7.repo
#或者
curl -o /etc/yum.repos.d/CentOS-Base.repo http://mirrors.aliyun.com/repo/Centos-7.repo
2.EPEL源
#epel(RHEL 7)
#wget -O /etc/yum.repos.d/epel.repo http://mirrors.aliyun.com/repo/epel-7.repo

#epel(RHEL 6)
#wget -O /etc/yum.repos.d/epel.repo http://mirrors.aliyun.com/repo/epel-6.repo
各大镜像源:
阿里云:https://opsx.alibaba.com/mirror
清华源:https://mirrors.tuna.tsinghua.edu.cn/
163源:http://mirrors.163.com/
华为源:https://mirrors.huaweicloud.com/
科大源:http://mirrors.ustc.edu.cn/
YUM实践案例
1.yum查询软件包
#列出软件仓库中可用的软件
[root@qmf ~]# yum list

#进行模糊查找
[root@qmf ~]# yum list|grep ftp

#列出软件包详情
[root@qmf ~]# yum info ftp
2.yum安装软件包
#安装软件只需要给出软件名
[root@qmf ~]# yum install traceroute

#安装过程中分析依赖关系后, 直接安装, 无需交互
[root@qmf ~]# yum install php -y

#安装本地的rpm包, 如果有依赖关系, 会自动从软件仓库中下载所需依赖
[root@qmf ~]# yum localinstall /mnt/Packages/bind-9.9.4-50.el7.x86_64.rpm

#安装网络上rpm包
[root@qmf ~]# yum install http://repo.zabbix.com/zabbix/3.4/rhel/7/x86_64/zabbix-release-3.4-2.el7.noarch.rpm
3.yum重装软件包
#检查软件是否存在
[root@qmf ~]# rpm -q vsftpd
vsftpd-2.2.2-24.el6.x86_64

#检查vsftpd软件配置文件
[root@qmf ~]# rpm -qc vsftpd
/etc/logrotate.d/vsftpd
/etc/pam.d/vsftpd
/etc/vsftpd/ftpusers
/etc/vsftpd/user_list
/etc/vsftpd/vsftpd.conf

#不小心删除vsftpd配置文件
[root@qmf ~]# rm -f /etc/vsftpd/vsftpd.conf

#重新安装软件
[root@qmf ~]# yum reinstall vsftpd

#再次检查
[root@qmf ~]# rpm -qc vsftpd
/etc/logrotate.d/vsftpd
/etc/pam.d/vsftpd
/etc/vsftpd/ftpusers
/etc/vsftpd/user_list
/etc/vsftpd/vsftpd.conf
4.yum更新软件包
#对比Linux已安装的软件和yum仓库中的软件, 有哪些需要升级
[root@qmf ~]# yum check-update

#更新acl软件
[root@qmf ~]#  yum update acl -y

#如果执行下面的命令,很危险这代表更新整个系统所有的软件,包括内核
[root@qmf ~]#  yum update -y
5.yum删除软件包
#先安装一个samba软件
[root@qmf ~]# yum install samba -y

#删除该软件包,会删除依赖
[root@qmf ~]# yum erase samba -y
[root@qmf ~]# yum remove samba -y
6.yum仓库相关指令
#列出yum源可用的软件仓库
[root@qmf ~]# yum repolist

#列出全部yum源可用和禁用的仓库
[root@qmf ~]# yum repolist all

#启用软件包
[root@db04 ~]# yum-config-manager --enable
建议:直接修改配置文件

#查看这个文件或命令属于哪个包
yum provides /etc/my.cnf
yum provides cd
7.yum缓存相关指令
#缓存yum源软件仓库, xml元数据文件
[root@qmf ~]# yum makecache

#缓存软件包, 修改yum全局配置文件
[root@qmf ~]# vim /etc/yum.conf
[main]
cachedir=/var/cache/yum/$basearch/$releasever
keepcache=1 //启动缓存

#查看缓存的xml文件
[root@qmf ~]# ls /var/cache/yum/x86_64/7/base/

#查看缓存软件包路径
[root@qmf ~]# /var/cache/yum/x86_64/7/

#另一种缓存rpm包方式

#1.安装插件支持只下载软件包不安装
[root@qmf ~]# yum install -y yum-plugin-downloadonly

#2.将软件下载至指定目录
[root@qmf ~]# yum install httpd -y --downloadonly --downloaddir=/tmp

#清除所有yum缓存
[root@qmf ~]# yum clean all

#只清除缓存的软件包
[root@qmf ~]# yum clean packages
8.yum包组相关指令
#列出已经安装和所有可使用的软件组
[root@qmf ~]# yum groups list

#安装一整个组的软件
[root@qmf ~]# yum groups install Development tools \
Compatibility libraries \
Base Debugging Tools

#yum删除包组
[root@qmf ~]# yum groups remove  -y Base
yum历史命令

#查看历史执行yum命令
[root@qmf ~]# yum history

#查询历史执行yum命令ID详细信息
[root@qmf ~]# yum history info N

#撤销历史执行过的yum命令
[root@qmf ~]# yum history undo N
YUM全局配置文件
yum的配置一般有两种方式:
1.全局配置文件/etc/目录下的yum.conf
2.子配置文件/etc/yum.repos.d/目录下的所有.repo文件
vim /etc/yum.cnf
cachedir=/var/cache/yum/$basearch/$releasever   //缓存目录
keepcache=0     //缓存软件包, 1启动 0 关闭
debuglevel=2    //调试级别
logfile=/var/log/yum.log    //日志记录位置
exactarch=1     //检查平台是否兼容
obsoletes=1     //检查包是否废弃
gpgcheck=1      //检查来源是否合法,需要有制作者的公钥信息
plugins=1       //是否启用查询
installonly_limit=5
bugtracker_url
# metadata_expire=90m //每小时手动检查元数据
# in /etc/yum.repos.d   //包含repos.d目录
YUM签名检查机制
rpm软件提供组织redhat在构建rpm包时, 使用其私钥private key对 rpm进行签名
客户端在使用rpm为了验证其合法性, 可以使用redhat提供的公钥public key进行签名检查
方式1: 指定公钥的位置
[root@qmf ~]# vim /etc/yum.repos.d/CentOS-Base.repo
[base]
name=CentOS-$releasever - Base mirrorlist=http://mirrorlist.centos.org/?release=$releasever&arch=$basearch&repo=os&infra=$infra #baseurl=http://mirror.centos.org/centos/$releasever/os/$basearch/
gpgcheck=1
gpgkey=file:///etc/pki/rpm-gpg/RPM-GPG-KEY-CentOS-7
方式2: 提前导入公钥
[root@qmf ~]# rpm --import /etc/pki/rpm-gpg/RPM-GPG-KEY-CentOS-7
[root@tianyun ~]# vim /etc/yum.repos.d/CentOS-Base.repo
[base]
name=CentOS-$releasever - Base mirrorlist=http://mirrorlist.centos.org/?release=$releasever&arch=$basearch&repo=os&infra=$infra #baseurl=http://mirror.centos.org/centos/$releasever/os/$basearch/
gpgcheck=1
方式3: 不进行签名验证
#不检查软件包的签名,或者修改配置文件
[root@qmf ~]# yum install httpd --nogpgcheck
制作本地YUM仓库
YUM的配置文件中的一些参数含义。
[ ] #仓库名称
name #仓库描述信息
baseurl #YUM源url地址 ,可以是file:// ftp:// http://
enabled #是否激活该YUM源(0代表禁用,1代表激活,默认为激活)
gpgcheck #安装软件时是否检查签名(0代表禁用,1代表激活)
利用linux系统光盘制作一个yum源:
1.挂载镜像
[root@qmf ~]# mount /dev/cdrom /mnt
2.备份原有仓库
[root@qmf ~]# gzip /etc/yum.repos.d/*
3.创建新仓库文件
#使用yum-config-manager命令添加本地仓库
[root@qmf ~]# yum-config-manager --add-repo="file:///mnt"
方式二
#手动添加repo配置文件(方式二)
[root@qmf ~]# vim /etc/yum.repos.d/cdrom.repo
[cdrom]
name=This is local cdrom
baseurl=file:///mnt
enabled=1
gpgcheck=0
5.刷新repos生成缓存
[root@qmf ~]# yum makecache
企业中YUM仓库
环境准备
| 系统 | IP | 角色 |
| centos7 | 10.0.0.90 | yum仓库服务端 |
| centos7 | 10.0.0.91 | 本地主机 |
服务端配置
1.基础环境准备
#关闭防火墙
[root@yum_server ~]# systemctl stop firewalld

#临时关闭selinux
[root@yum_server ~]# setenforce 0

#安装ftp服务,启动并加入开机启动
[root@yum_server ~]# yum -y install vsftpd
[root@yum_server ~]# systemctl start vsftpd
[root@yum_server ~]# systemctl enable vsftpd

#开启yum缓存功能
[root@yum_server ~]# vim /etc/yum.conf
[main] cachedir=/var/cache/yum/$basearch/$releasever
keepcache=1
[root@yum_server ~]# yum clean all
2.提供基础base源
[root@yum_server ~]# mkdir /var/ftp/centos7
[root@yum_server ~]# mount /dev/cdrom /mnt
[root@yum_server ~]# cp -rp  /mnt/Packages/*.rpm /var/ftp/centos7
3.提供第三方源,同步中科大的源
#进入ftp目录
[root@yum_server centos]# cd /var/ftp/

#同步中科大的源
[root@yum_server ftp]# rsync -avzP rsync://rsync.mirrors.ustc.edu.cn/repo/nginx ./
4.安装createrepo并创建 reopdata仓库
#安装createrepo
[root@yum_server ~]# yum -y install createrepo
#生成仓库信息
[root@yum_server ~]# createrepo /var/ftp/
客户端使用yum源
1.配置并使用base基础源
[root@yum_client ~]# gzip /etc/yum.repos.d/*
[root@yum_client ~]# vim /etc/yum.repos.d/centos7.repo
[centos74]
name=centos74_base
baseurl=ftp://10.0.0.90/centos7
gpgcheck=0
2.客户端指向本地ftp源
[root@yum_client ~]# vim /etc/yum.repos.d/nginx.repo
[ftp]
name=local ftpserver
baseurl=ftp://10.0.0.90/nginx
gpgcheck=0
源码包概述
源码包指的是开发编写好的程序源代码,但并没有将其编译为一个能正常使用的工具。
1.部分软件,官方只提供源码包,需要自行编译安装
2.运维需要规范时,我们想把所有的软件全都安装到同一个目录下
PS:windows的QQ,微信,游戏等...全都要放到D盘的某一个目录下
3.有些软件,官方刚发布,还没来得及制作成RPM包,那么我们可以自行编译安装
源码包优点:
1.有了源码包,那我就可以自行修改代码,提供我们使用,传说中的二次开发
2.可以定制需要的相关功能
3.新版本优先更新源码
4.自动化规范,方便落地
缺点:
1.相对于yum安装,复杂
2.耗时比较长
常见的软件,源码包均可以去官方网站获取源码包。
例如:
mysql
nginx
apache
...
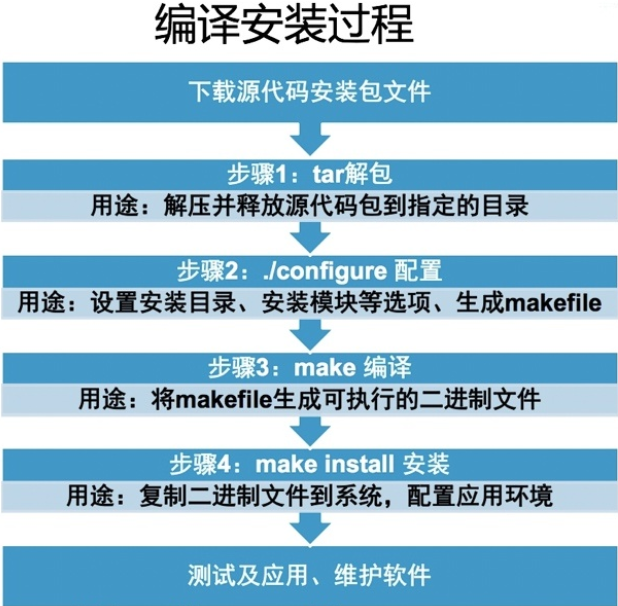
源码包安装步骤
1.解压 tar
2.生成 ./configure cmake
3.编译 make
4.安装 make install

源码包安装实战
通过编译Nginx源码包安装
#1.基础环境准备
[root@node1 ~]# yum install -y gcc make wget

#2.下载源码包(源码包一定要上官方站点下载,其他站点不安全)
[root@node1 ~]# mkdir -p /soft/src
[root@node1 src]# cd /soft/src
[root@node1 src]# wget http://nginx.org/download/nginx-1.12.2.tar.gz

#3.解压源码包,并进入相应目录
[root@node1 src]# tar xf nginx-1.12.2.tar.gz
[root@node1 src]# cd nginx-1.12.2

#4.配置相关的选项,并生成Makefile
[root@node1 nginx-1.12.2]# ./configure --help|head
  --help                             print this message
  --prefix=PATH                      set installation prefix
  --sbin-path=PATH                   set nginx binary pathname
  --modules-path=PATH                set modules path
  --conf-path=PATH                   set nginx.conf pathname
  --error-log-path=PATH              set error log pathname
  --pid-path=PATH                    set nginx.pid pathname
  --lock-path=PATH                   set nginx.lock pathname
#后面的内容省略了,使用 ./configure --help 命令查看可以使用的选项。
#一般常用的有 --prefix=PREFIX 这个选项定义软件包安装到哪里。
#建议,源码包都是安装在/soft/目录下。

#5.指定编译参数
[root@node1 nginx-1.12.2]# ./configure --prefix=/soft/nginx-1.12.2 --user=nginx --group=nginx --with-http_ssl_module --with-http_stub_status_module

#6.验证这一步命令是否成功, 非0d都不算成功
[root@node1 nginx-1.12.2]# echo $?
0

#7.编译并安装
[root@node1 nginx-1.12.2]# make
[root@node1 nginx-1.12.2]# make install
[root@node1 nginx-1.12.2]# echo $?
源码编译报错信息处理
checking for C compiler ... not found ./configure: error: C compiler cc is not found
#解决方案
# yum -y install gcc gcc-c++ make
./configure: error: the HTTP rewrite module requires the PCRE library.
You can either disable the module by using --without-http_rewrite_module
option, or install the PCRE library into the system, or build the PCRE library
statically from the source with nginx by using --with-pcre=<path> option.

#解决方案
# yum install -y pcre-devel
./configure: error: the HTTP gzip module requires the zlib library.
You can either disable the module by using --without-
http_gzip_module option, or install the zlib library into the
system, or build the zlib library statically from the source with
nginx by using --with-zlib=<path> option.

#解决方案:
# yum -y install zlib-devel
./configure: error: SSL modules require the OpenSSL library.
You can either do not enable the modules, or install the OpenSSL
library into the system, or build the OpenSSL library statically
from the source with nginx by using --with-openssl=<path> option.

#解决方案
# yum -y install openssl-devel
自定义RPM包,并制作YUM仓库
自定义RPM包
yum -y install ruby rubygems ruby-devel

gem sources -a http://mirrors.aliyun.com/rubygems/
gem sources --remove http://rubygems.org/
gem install fpm -v 1.3.3
如果安装不上,则可以使用下面的命令下载fpm包
wget http://download.driverzeng.com/fpm-1.3.3.x86_64.tar.gz
准备环境:
mkdir /usr/local/tools -p

cd /usr/local/tools/

wget http://nginx.org/download/nginx-1.6.3.tar.gz

sed -i 's#keepcache=0#keepcache=1#g' /etc/yum.conf  开启yum缓存

find /var/cache/ -type f -name '*rpm'|xargs rm -f 清除yum缓存
安装nginx:
yum install pcre-devel openssl-devel -y

find /var/cache/ -type f -name '*rpm'

find /var/cache/ -type f -name '*rpm'|xargs cp -t /tmp/

cd /tmp/ && tar zcf nginx_yum.tar.gz *.rpm

sz nginx_yum.tar.gz

cd /usr/local/tools

useradd nginx -M -s /sbin/nologin

tar xf nginx-1.6.3.tar.gz

cd nginx-1.6.3

./configure --prefix=/usr/local/nginx-1.6.3 --user=nginx --group=nginx --with-http_ssl_module --with-http_stub_status_module

make && make install

ln -s /usr/local/nginx-1.6.3/ /usr/local/nginx
写脚本:
mkdir -p /server/scripts/

cd /server/scripts/

cat >>nginx_rpm.sh<<EOF
#!/bin/bash
useradd nginx -M -s /sbin/nologin
ln -s /usr/local/nginx-1.6.3/ /usr/local/nginx
EOF
打包:
fpm -s dir -t rpm -n nginx -v 1.6.3 -d 'pcre-devel,openssl-devel' --post-install /server/scripts/nginx_rpm.sh -f /application/nginx-1.6.3/
定制YUM仓库
#安装yum仓库制作命令
yum -y install createrepo

mkdir -p /application/yum/centos7/x86_64/

cd /application/yum/centos7/x86_64/

cp /home/oldboy/tools/*.rpm .
初始化:
createrepo /application/yum/centos6/x86_64/
检查是否开启80端口:
netstat -ntlup |grep 80

cd /application/yum/centos7/x86_64/

python -m SimpleHTTPServer 80 &>/dev/null &
打开浏览器输入你的外网IP
测试:开启另外一台机器
cd /etc/yum.repos.d

mkdir yum_bak && mv *repo yum_bak

vim qmf.repo
[qmf]
name=Server
baseurl=http://10.0.0.61
enable=1
gpgcheck=0

清本地yum缓存:
yum clean all
显示yum仓库内容:
yum list

yum makecache

http://blog.qmf.com/autodeploy-yum/
配置nginx:
    server {
        listen       80;
        server_name  localhost;
        location / {
#            root   html;
            root   /data/yum_data/;
#            index  index.html index.htm;
            autoindex on;
            access_log off;
        }
    }

- 控制面板
- 搜索
- 你好,朋友
-
真是美好的一天!
- 站点信息
-
- 文章总数:90
- 页面总数:0
- 分类总数:9
- 标签总数:0
- 评论总数:0
- 浏览总数:119133
 豫公网安备41042502000209号